Deborah R. Fowler
Linear Workflow in Houdini
NOTE: as of version 13 the linear workflow
values are set up default
Updated on Sept 10 2013
Updated Sept 29 2015
In Houdini 14, linear workflow is default. There is excellent documentation under Linear lighting and color.
In the first LSR getting started tutorial on SideFX website, there is an introduction to creating a linear workflow.
An excellent resource is also Peter Quint's Pills Scene 3 where he covers linear workflow.
A quick explanation about linear workflow with the steps to create it in Houdini are summarized below.
Images not converted tend to look dark in the shadows and the brights often get blown out. The linear workflow keeps everything in linear space (looks dark) but then gamma is applied.
There are a number of websites that explain linear space and why you should work this way.
A really excellent explanation of using linear workflow exists here with a pdf version here.
Gamma correction - is not a law, it's a technique.
Other articles that might be useful:
www.siggraph.org/education/materials/HyperGraph/color/gamma_correction/gamma_intro.html
And Cinema 4D at greyscalegorilla.com/blog/2010/11/what-is-linear-workflow-and-how-can-it-help-you-renders-look-better/
and Peter Quint recommends softimage.wiki.softimage.com/index.php?title=Gamma%2C_Linear_Color_Space_and_HDR
Read here in fxguide about the history of linear workflow and the introduction of OpenEXR (created by ILM) in 1999 and released to the public in 2003.
Note that you must correct all color maps brought in (HDRI maps are already in linear space) or you will be double gamma correcting. (degamma 1.0/Target gamma typically 2.2).
In Houdini: (information below is for versions before 13)
If your image is linear, then in mplay the brightness settings are +/- f/stops.
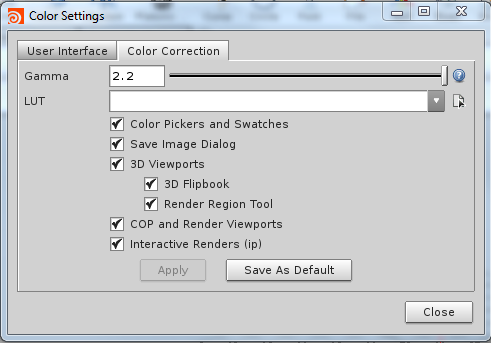
1. Under the menu:
Edit / Color Settings / Color Correction tab change gamma from 1 to 2.2 and turn on all checkboxes. Save as default. (PQ: This is going to display color swatches and rendered images back into their original linear state.) By doing this, you are working in a linear workflow.
One important thing to add to the webinar information, is that this changes the render view display's gamma, but does not change the display if you are instead rendering to mplay.
In mplay, change the gamma from the default setting of 1.0 to 2.2 as seen below.

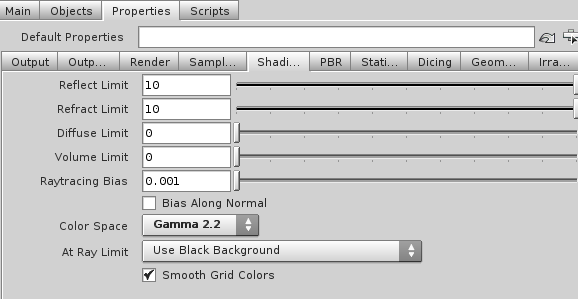
Most importantly, you also want to change the value under the shading tab in the mantra node to be color space 2.2, not linear. This will cause darker parts of the image to receive more samples.
2. If desired you can also type d in the scene view and under the Effects tab turn on HDR rendering and high quality lighting. (Be careful here, performance depends on your computer).

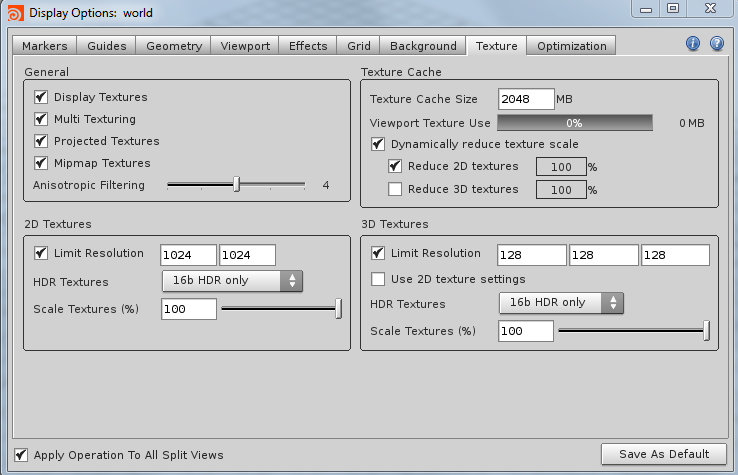
3. In the display options also go to the Texture tab and ensure 16 bit HDRI is set for both 2 and 3D and limit resolution is on.
Nuke Tips coming soon.
From PQ, Pills Part 3: Adjust texture images by "degammify" with gamma .45 (1/2.2), convert to 16 bit floating point and writing it out. exr, hdr and non-color (bump etc) are already linear so there is no need to convert them.