Deborah R. Fowler
click here for Motion Capture Resources
next step
Posted on Dec 8 2013
Updated Jan 22 2014
Blade 2.6 User's
Guide
This document is available in the
binder in the studio as well as online at deborahrfowler.comAt the studio in SCAD-SAV:
The buttons to power the camera have been integrated into one switch (thanks Neil!) so now the fan and cameras are powered by a single switch.
In practice it is best to have the lights off during calibration and capture (particularly the inside wall light by the desk which may be detected).
Currently we are using a passive optical system with 12 Vicon MX series cameras: MX4 (4 mega pixel).
With 2.6 our volume is bigger now (by about one foot all around) since it has less difficulty with occluded markers).
Log on to the machine on the right - that is the one connected to the camera.
Start Vicon Blade 2.6 (Blade 1.7 is on the desktop but is an older version that you do not want to use.)
Select a profile (C:\Users\Public\Public Documents\Vicon\Blade2.6\Default.ini is fine)
When you are working in blade - just say NO. In other software when you are asked to save the correct answer is yes; in vicon it is no - no no no.
Click on each link for more details or use the menu at the left:
|
Brief Summary: Executive Summary for Capturing - Overview of the process
Once you have the basic capturing achieved, you can also try finger capture. Finger capture is much easier now in Vicon Blade 2.6.
Additional information for Finger Capture
Additional information for Prop Capture
Streaming
Troubleshooting
Our software and studio space are capable of allowing two actor capture. It is recommended that the actors ROM are captured and calibrated one after another.
(It is also advised you learn first to capture and process one actor).
Be sure in the data management window to check off the previous character while you are calibrating your new character and be sure to label your new actor in the processing steps.
File types
- xcp - camera calibration file saved to this type - save it in the directory you create for your data
- x2d - the raw capture data that
is saved automatically when you capture a take and click
stop
- hdf - intermediate files readable by blade only and are handy for saving processing steps
- vsk - the skeleton created for
blade (vicon skeleton for labeling) after the calibrate step
in the labeling stage of the actor range of motion (ROM)
- vss - the solving skeleton that is saved after the solve step when processing the actor ROM
- fbx - (and less commonly
c3d and bvh) - exported file to be used by 3-D package
Interface tips
- Hint: spacebar - will bring up a hot box to access many of the menu items, in particular solve/constraints is very handy (more in processingROM)
- V and L at the top of the pane define what you are seeing - V is for view, L is for layout. There are also selection filters and view filters.
- Track Objects - camera tracks whatever is selected as you drag through the timeline
- Losing markers during capture in 2.6 is not as crucial as it was in 1.7.
Tab Overview
There are three major tabs at the top of the screen:
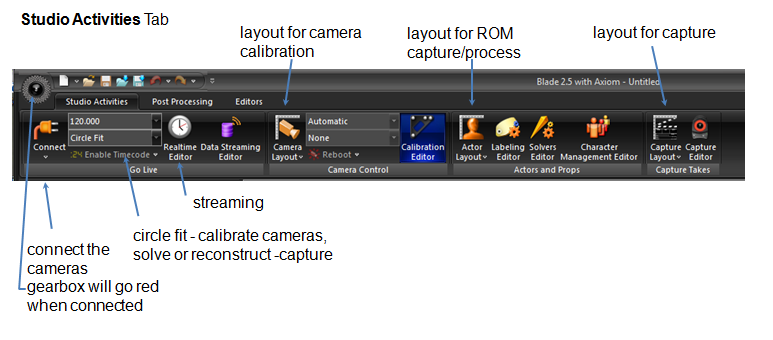
- Studio Activities
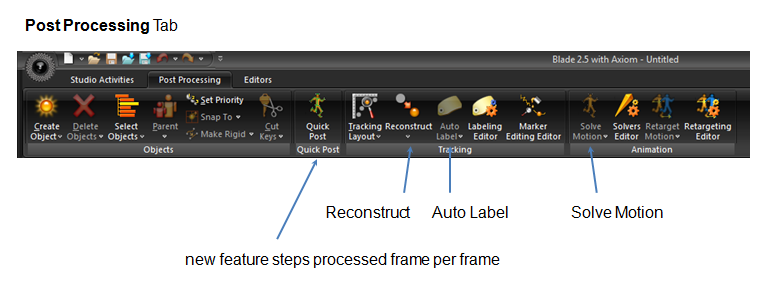
- Post Processing and
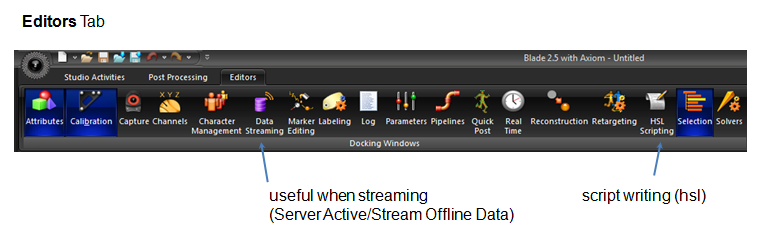
- Editors (for those of you who have used 1.7, the Workspace tab is gone)
REMINDER
F5 - to refresh
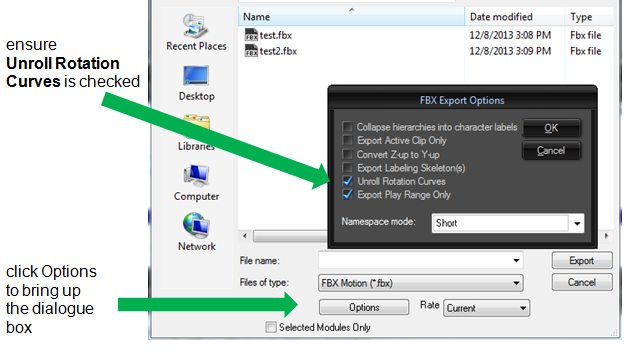
When exporting fbx - be sure to check Unroll Rotation
Curves
For those of you without rigging experience, I would strongly suggest you take ANIM 280 and if you are interested in the character TD minor there are four other rigging classes for various concentrations (CHR 310, 314, 340 and 350).